
You took a photo on your iPhone, sent it to your computer, and now it will not open. Or a website refuses the upload, or a friend on Windows sees a blank icon. The file name ends in .heic, and that is the whole problem: HEIC is the photo format iPhones use by default, and plenty of software still cannot read it.
The fix is to turn the photo into a JPG, which opens almost everywhere. This guide shows four ways to do that, from the quickest to the most permanent, and explains what you gain and lose when you convert. The file sizes below come from a real photo that we encoded with Apple’s own HEIC encoder, not from estimates.
The short answer
Pick the method that matches what you need right now.
A few photos, on any computer or phone
Browser
Convert them in your browser with a HEIC to JPG tool that runs on your device. Nothing to install, nothing uploaded.
Stop your iPhone making HEIC files
iPhone
Switch the camera to Most Compatible. New photos are saved as JPG from then on; old ones stay HEIC.
Open HEIC photos on Windows
Windows
Install the HEIF and HEVC extensions from the Microsoft Store, or convert the photos to JPG first.
Convert on a Mac
Mac
Open the photo in Preview, choose File, then Export, and pick JPEG as the format.
Why HEIC photos will not open
HEIC is Apple’s name for photos stored in the HEIF container and compressed with HEVC, the same codec used for modern video. iPhones and iPads have saved photos this way by default since iOS 11 because it needs fewer bytes than JPG for the same picture, so more photos fit on the phone.
The catch is licensing. HEVC is covered by patents, and paying for them is complex and expensive, so most software makers have not added it. According to Can I use, Safari 17 and later is the only major browser that can show HEIC images; Chrome, Edge, Firefox and Samsung Internet cannot. That is why a website upload form often rejects HEIC, and why Windows needs extra components before it can display these photos.
Method 1: Convert HEIC to JPG in your browser
This works on Windows, Mac, Linux, Chromebooks and phones, and it is the quickest way when you have a handful of photos.
- Open HEIC to JPG on Imagefold.
- Choose a
.heicor.heifphoto, or drop it onto the page. - Keep JPG selected and leave the quality at 90 percent, or lower it for a smaller file. Choose PNG only if you need a lossless copy for editing.
- Select Convert to JPG, compare the before and after, then Download JPG.
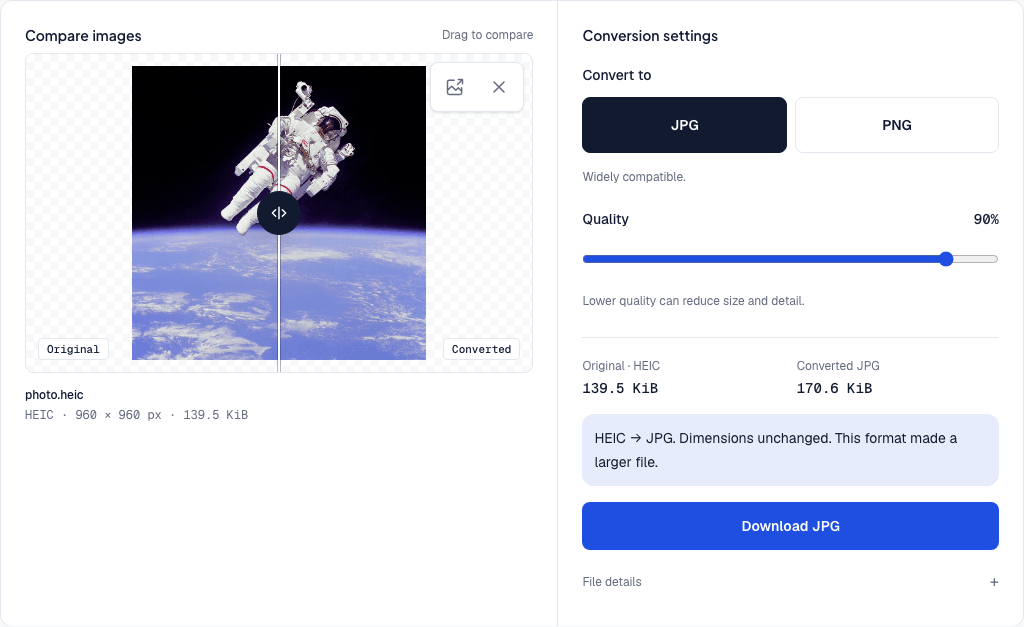
The photo never leaves your device. Safari decodes HEIC itself; in other browsers Imagefold loads libheif, an open-source decoder, and runs it inside your browser. Either way, no file is uploaded to a server.
The converted file keeps the pixel dimensions and the orientation you see in the preview. It does not copy EXIF metadata, so the location and camera details stay behind. That is usually a good thing when you share a photo, but keep the original if you want those details.
Method 2: Make your iPhone save JPG instead
If HEIC keeps getting in your way, change the camera setting once. Apple documents these steps in Using HEIF or HEVC media on Apple devices:
- Open Settings, then tap Camera.
- Tap Formats.
- Choose Most Compatible.
From now on, new photos are saved as JPG and new videos as H.264. Two things to know before you switch:
- Old photos do not change. Everything already in your library stays HEIC. Convert those with one of the other methods.
- The files get bigger. JPG needs more space for the same picture, so your library and iCloud storage fill up faster. If storage is tight, keep HEIC and convert only the photos you share.
When the iPhone converts for you
You may not always need to do anything. Apple says that when you share by AirDrop, Messages or email, a photo “might automatically be shared in a more compatible format, such as JPEG” if the receiving device does not support HEIF. When you copy photos to a computer over a USB cable, they may also be converted to JPEG. If you would rather receive the original HEIC files, Apple’s steps are: open Settings, tap Apps, tap Photos, then scroll down and tap Keep Originals.
These conversions depend on the receiving device, so they are not guaranteed. If you need a JPG for a specific upload, convert it yourself.
Method 3: Open and convert HEIC on Windows
Windows can read HEIC once two extensions from the Microsoft Store are installed. According to Microsoft’s support page:
- Install HEIF Image Extensions, which Microsoft lists as free.
- Install HEVC Video Extensions, which Microsoft lists at $0.99. Microsoft notes that you need both, “even if you only plan on using photos and not videos.”
- Restart the Photos app. Your HEIC photos should now open.
Once Windows can read the photos, you can save a JPG copy from an image editor. In Paint, for example, open the photo and choose Save as, then a JPEG picture. If Paint cannot open the file, the extensions are not installed correctly.
If you do not want to buy an extension for a few photos, use the browser method above instead. It works on Windows without installing anything.
Method 4: Convert HEIC to JPG on a Mac
Every Mac since macOS High Sierra opens HEIC, so converting takes a few clicks in Preview, as described in Apple’s Preview guide:
- Open the photo in Preview.
- Choose File, then Export.
- Open the Format menu and choose JPEG. Adjust the quality slider if you want a smaller file.
- Give the copy a name and select Save.
Preview saves a new JPG and leaves the HEIC untouched. If the photo is in the Photos app, select it there and choose File, then Export to save a JPEG copy the same way.
Which method should you use?
| Situation | Best method | Install anything? |
|---|---|---|
| A few photos to upload or send today | Browser converter | No |
| You never want HEIC again | iPhone camera set to Most Compatible | No, but old photos stay HEIC |
| You view many iPhone photos on a Windows PC | HEIF and HEVC extensions | Yes, two Microsoft Store extensions, one paid |
| You work on a Mac | Preview or Photos, File then Export | No |
| The photos are private | Any method that runs on your own device | Avoid converters that upload your files |
Does converting HEIC to JPG reduce quality?
Both HEIC and JPG are lossy: they save space by dropping detail your eye barely notices. Converting means saving the photo a second time with a different method, so a tiny amount of extra detail is lost. To see how much, we took a 960 × 960 pixel public-domain NASA photo, saved it as HEIC with Apple’s encoder at its default setting, then converted that HEIC to JPG and PNG.
- HEICApple default140 KiB
- JPGquality 90169 KiB+21%
- JPGquality 80125 KiB−10%
- PNGlossless1.18 MiB+763%
File size of the same photo. The HEIC is the reference; percentages show how much larger or smaller each converted copy is.
Here is what the numbers mean in practice:
- JPG at quality 90 is the safe default. It came out at 169 KiB, 21 percent larger than the 140 KiB HEIC. Measured against the original photo, it stayed almost as close as the HEIC itself: a similarity score (PSNR) of 41.1 dB versus 41.8 dB, where higher means closer to the original. You would not see the difference at normal viewing size.
- JPG at quality 80 is smaller than the HEIC at 125 KiB, 10 percent less, but its score drops to 37.6 dB. That is fine for chat and social media, and visible if you zoom in on fine detail.
- PNG is the wrong choice for photos. It was 1.18 MiB, about 9 times the size of the HEIC, without looking any better than the JPG at quality 90. Choose PNG only when an editing app needs a lossless copy.
This is one photo at 960 × 960 pixels. A full-size iPhone photo has many more pixels, so every file is larger, and results vary with the picture. The direction is the same: converting HEIC to JPG at high quality costs some extra space, not visible quality. To shrink the JPG further, compress it or resize it to the size you actually need.
What you lose when you convert
A JPG is a plain still picture, so a few things a HEIC can carry do not make the trip:
- Live Photo motion. Only the main still image is converted.
- Depth and HDR data. Portrait depth maps are dropped, and HDR photos become standard 8-bit images.
- Location and camera details, when you convert with a tool that does not copy EXIF metadata, as Imagefold does. Other converters may keep them, so check before you share a photo taken at home.
Keep the original HEIC if any of these matter to you, and use the JPG as the copy you send or upload.
Key takeaways
- HEIC is the iPhone’s default photo format. It saves space but many browsers, websites and Windows PCs cannot open it.
- To convert a few photos without installing anything, use a browser converter that runs on your device, such as HEIC to JPG.
- To stop new HEIC photos, set Settings › Camera › Formats to Most Compatible. Existing photos stay HEIC.
- On Windows, the Photos app needs two Microsoft Store extensions; on a Mac, Preview exports JPEG with File › Export.
- JPG at quality 90 looks the same as the HEIC but is usually a little larger. Never just rename a
.heicfile to.jpg.
For more on how HEIC compares with JPG, PNG, WebP and AVIF, read Image file formats explained.